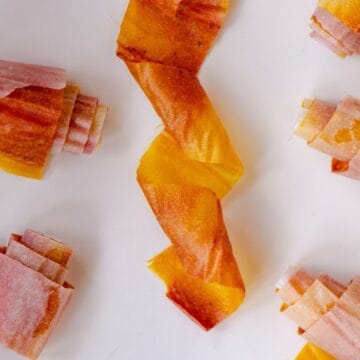
Let me show you how to make your very own fruit roll-ups from scratch out of simple ingredients! All you need is fruit and lemon juice- no sugar. You can use a dehydrator or the oven; it's easy!
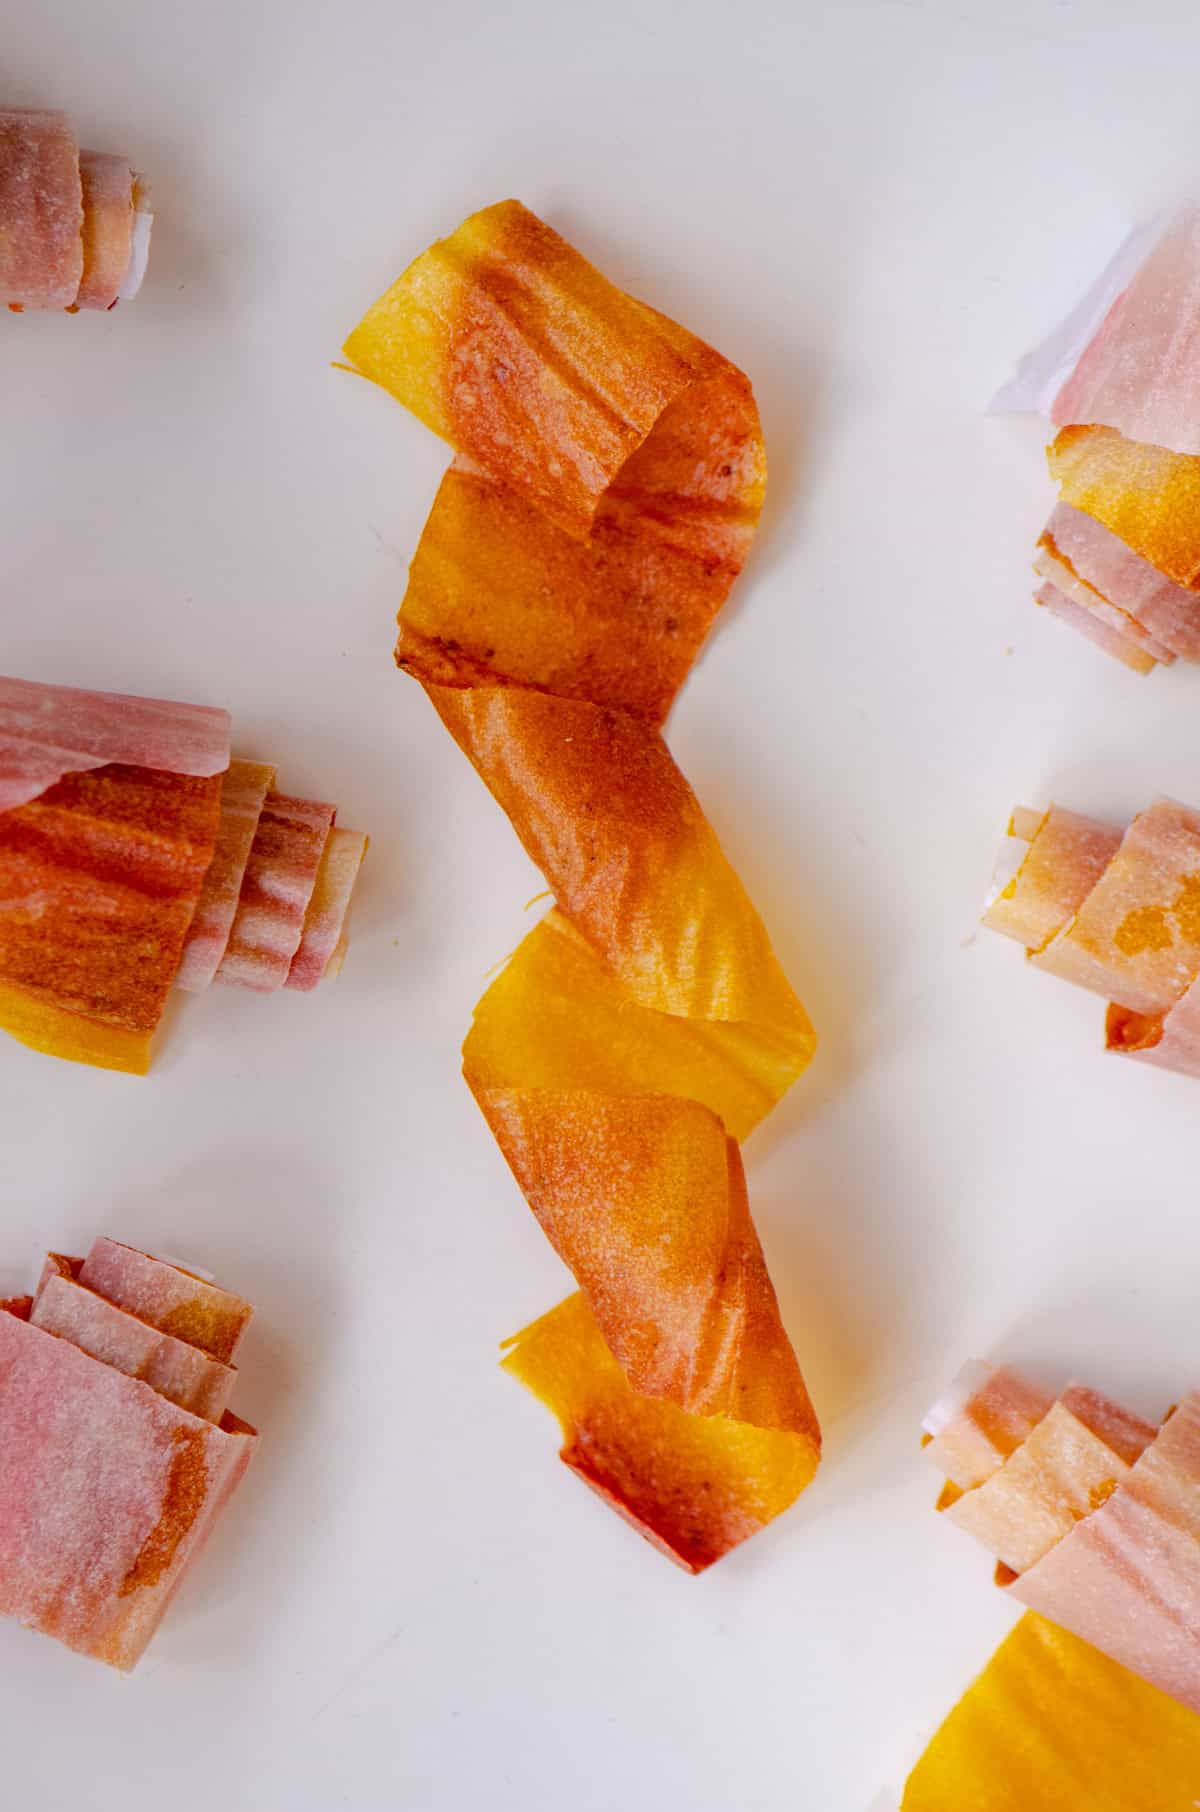
I love red fruit roll-ups like my rhubarb fruit roll ups, but these strawberry ones with a mango swirl are a new favorite.
Recipe Summary: How To Make Fruit Roll-ups
- ✅ Recipe Name: Homemade Fruit Roll-Ups
- 🧑🍳Equipment Needed: Blender, oven or dehydrator.
- 🕒 Ready In: 9hrs, 30 minutes
- 👪 Serves: 25 (easy to scale)
- 🍽 Calories: 24 per serving
- 🥣 Main Ingredients: Mangoes, strawberries, lemon juice
- 📖 Dietary Info: Make-a-head friendly, kid-friendly
- ⭐ Why You'll Love It: Incredible for lunch boxes, hiking snacks, road trip snacks, and snacks for the plane!
SUMMARIZE & SAVE THIS CONTENT ON
As a healthy mom, I'm a huge fan of recipes that are simple: with few ingredients and not a lot of hands-on work. I remember being young at school and wanting to trade snacks for someone with the fruit by the foot; my mom wouldn't buy those, probably for the cost and the food coloring dye; she avoided them.
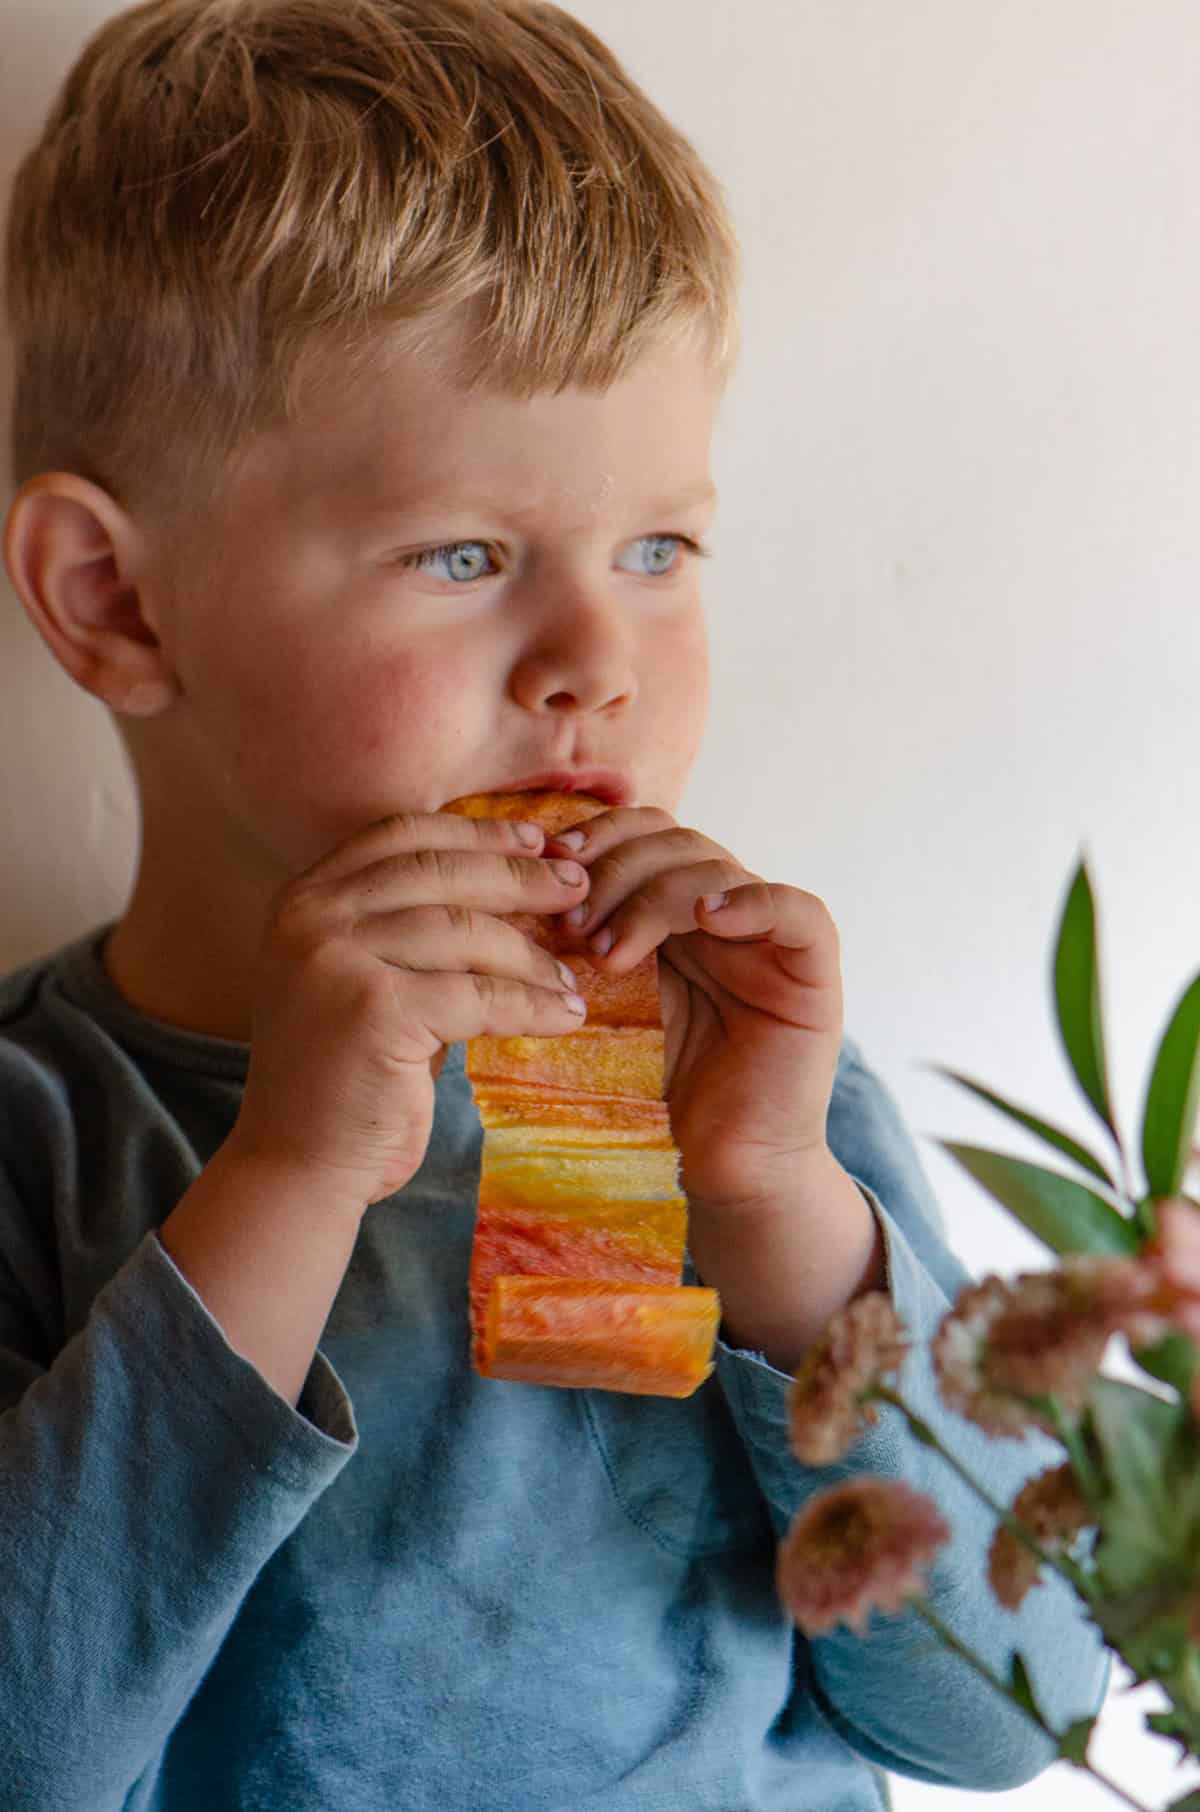
Homemade fruit leather has been a lifesaving snack for our family: incredible for lunch boxes, hiking snacks, road trip snacks, and snacks for the plane!
Why This Recipe Works
- This recipe is made with fruit, and lemon juice.
- You will need a blender to make a fruit puree.
- I do not cook my fruit leather before drying it out (some do). I think it's an unnecessary step that makes the process take longer and use more dishes.
- You can use an oven at the lowest heat or a dehydrator. (I'll tell you which dehydrator I like the best below).
- Your oven or food dehydrator will need to be on for about 6-10 hours.
- Parchment paper or silicone baking mats are essential for this recipe.
Key Ingredients
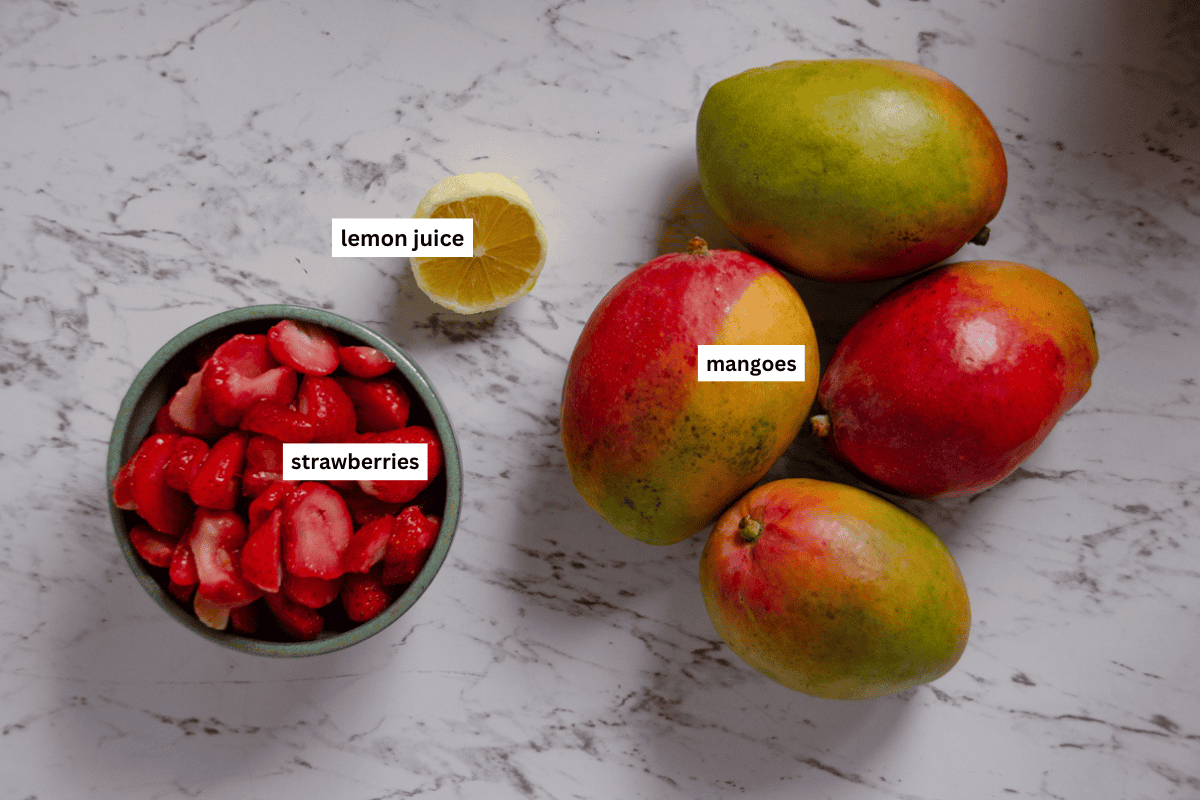
- Lemon juice: The acidic juice helps maintain the color of the fruit while it dries out, making it brighter.
- Mango: I am using the large Kent mangoes for this recipe; other mango varieties work just fine!
- I am using mango and strawberries for this fruit leather recipe, but other fruit you could use are apples, kiwi, and pineapple.
See the recipe card for full information on ingredients and quantities.
Equipment needed to make fruit leather
- Blender (or a food processor): You will need a food processor or blender to make the fruit completely smooth. You want to have smooth fruit puree when dehydrating it into fruit leather; chunks will make the drying process much longer.
- Parchment paper or silicone mat: It worked well to make this fruit leather on parchment paper, and then I roll up the fruit leather and parchment paper together and cut it into 1.5-2 inch chunks for the perfect fruit roll-up. However, using a silicone mat is more environmentally friendly. Do not use wax paper; it will melt into your fruit leather.
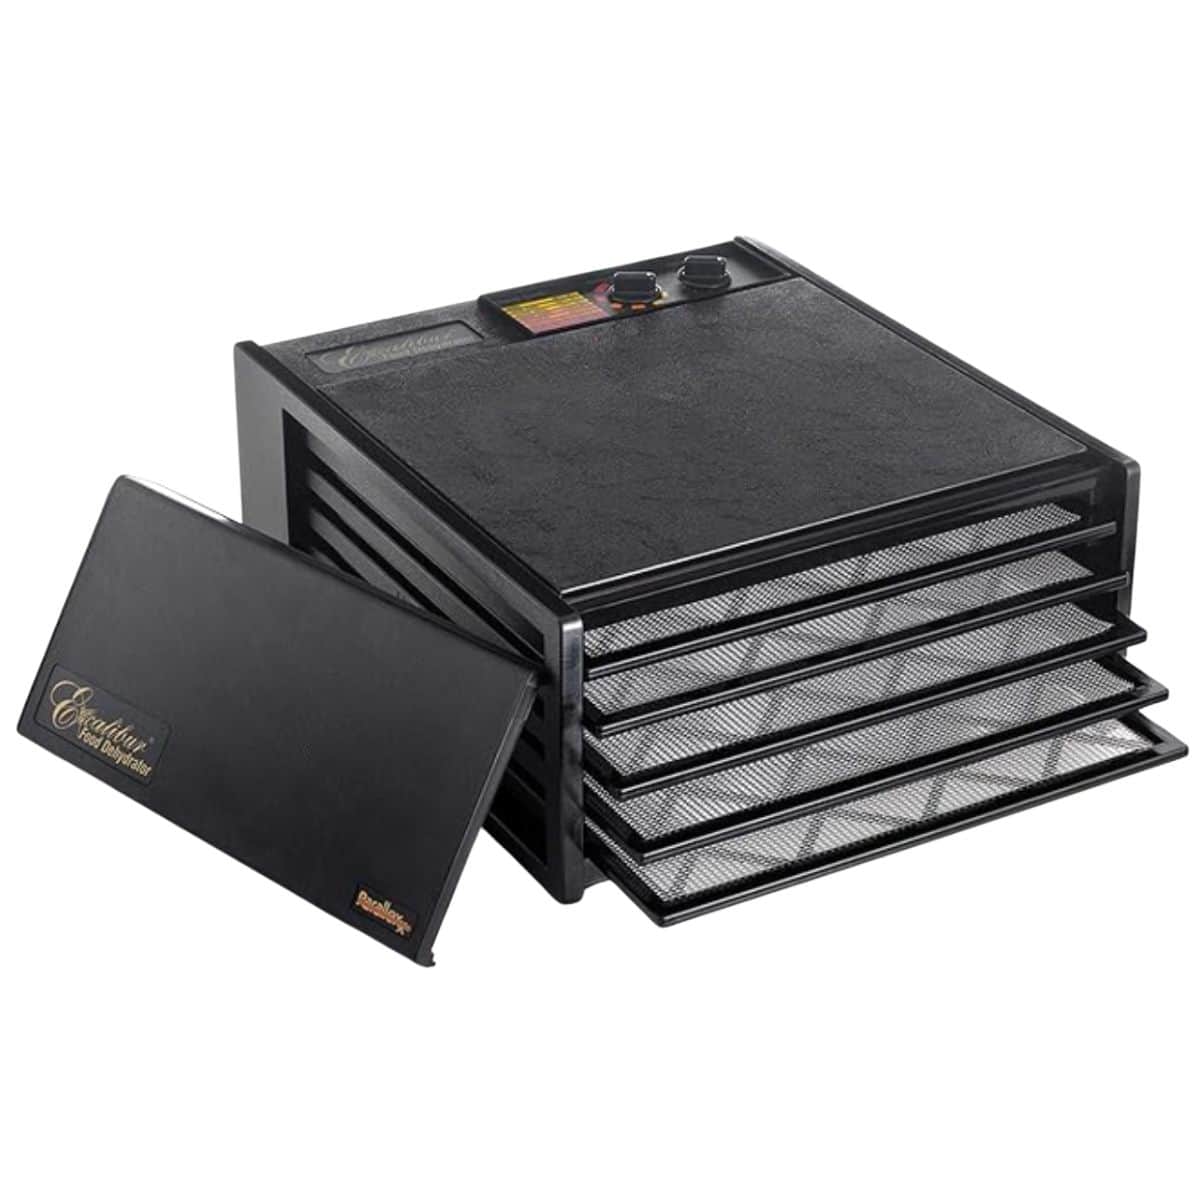
- Dehydrators (if you don't have one, you can use your oven): I have used a round dehydrator and a square Excalibur dehydrator. I liked the Excalibur better! More efficient in drying, better for cutting parchment paper the right size, easier to spread the fruit onto trays, and better for cutting up the leather into fruit rolls once they are dry. Honestly, look at the thrift store if this is something you want. I found mine there!
How to Make Homemade Fruit Roll-ups (Fruit Leather)
Follow the photos from my kitchen to make your very own fruit roll-ups!
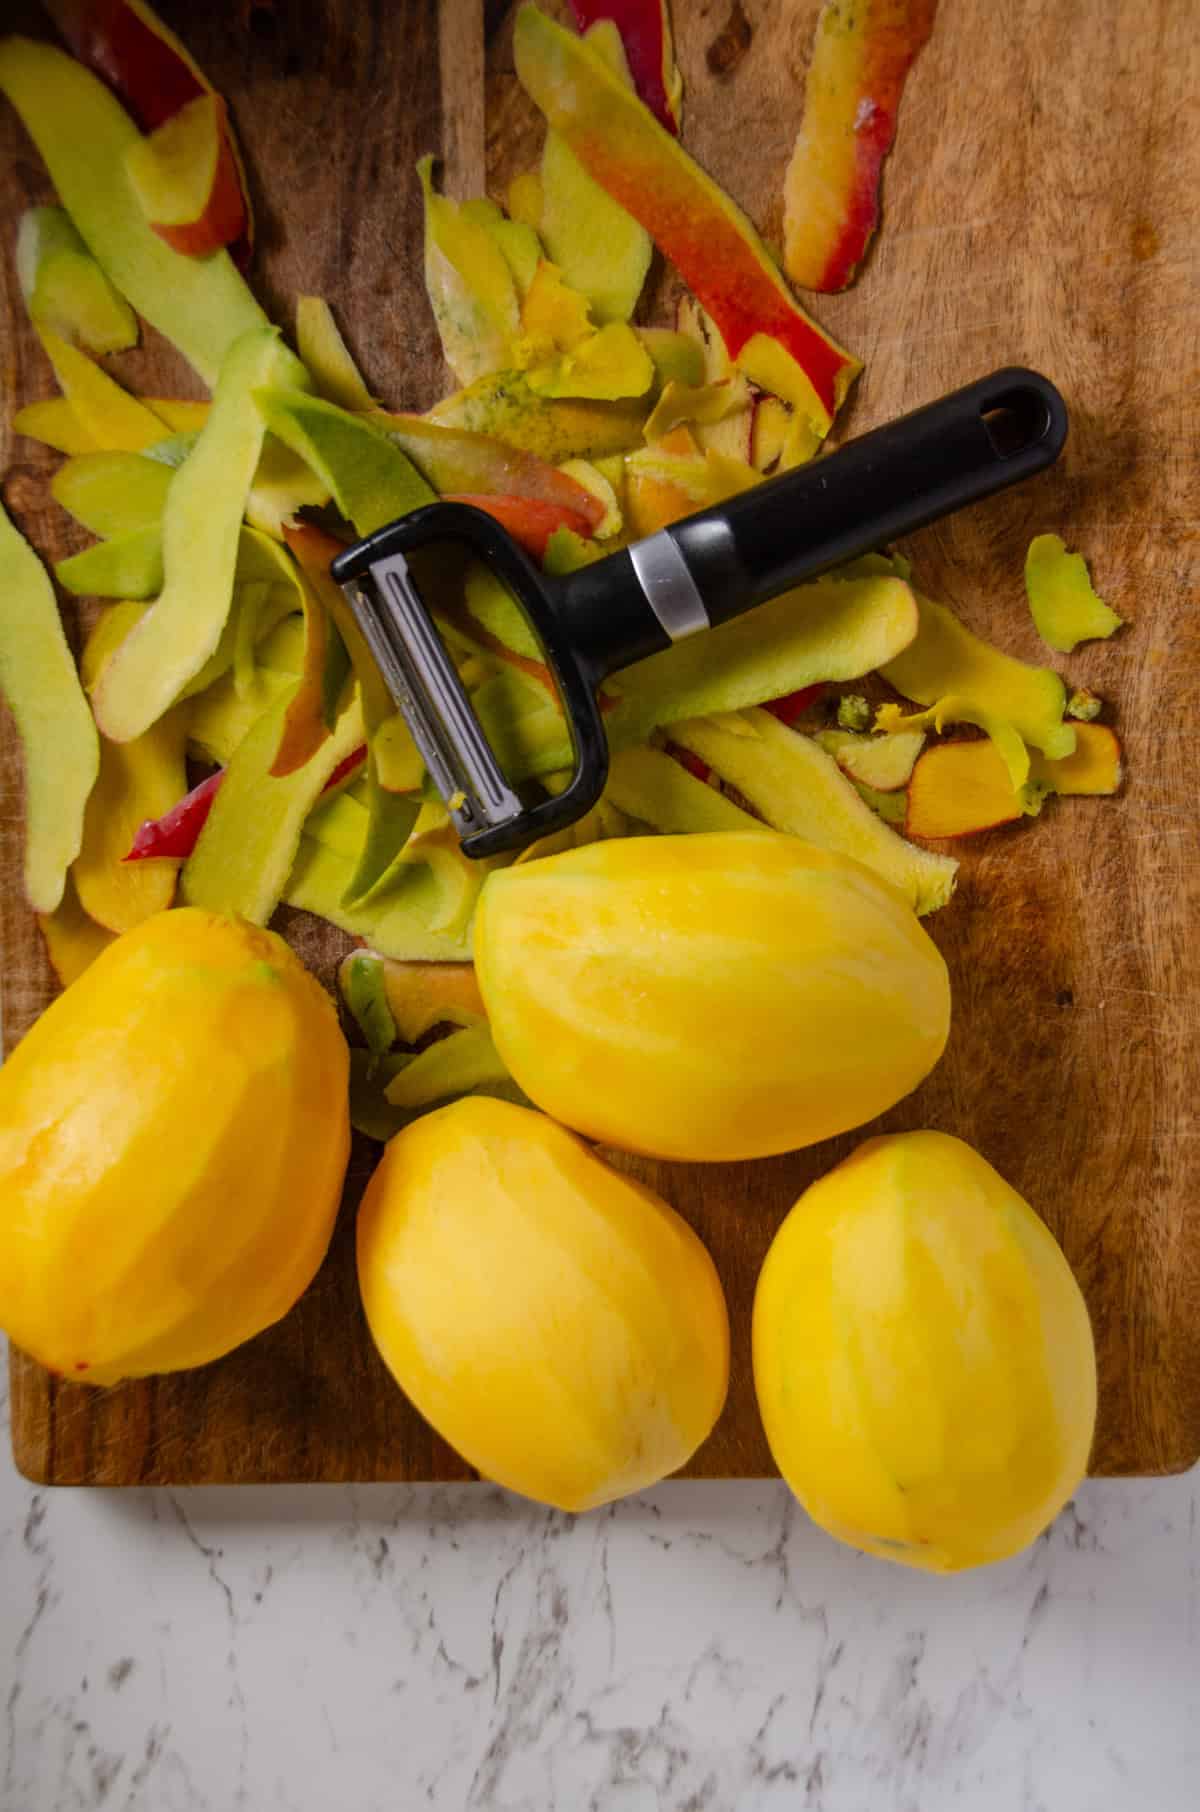
- Prep fruit: Peel the mangoes. Then cut them into chunks.
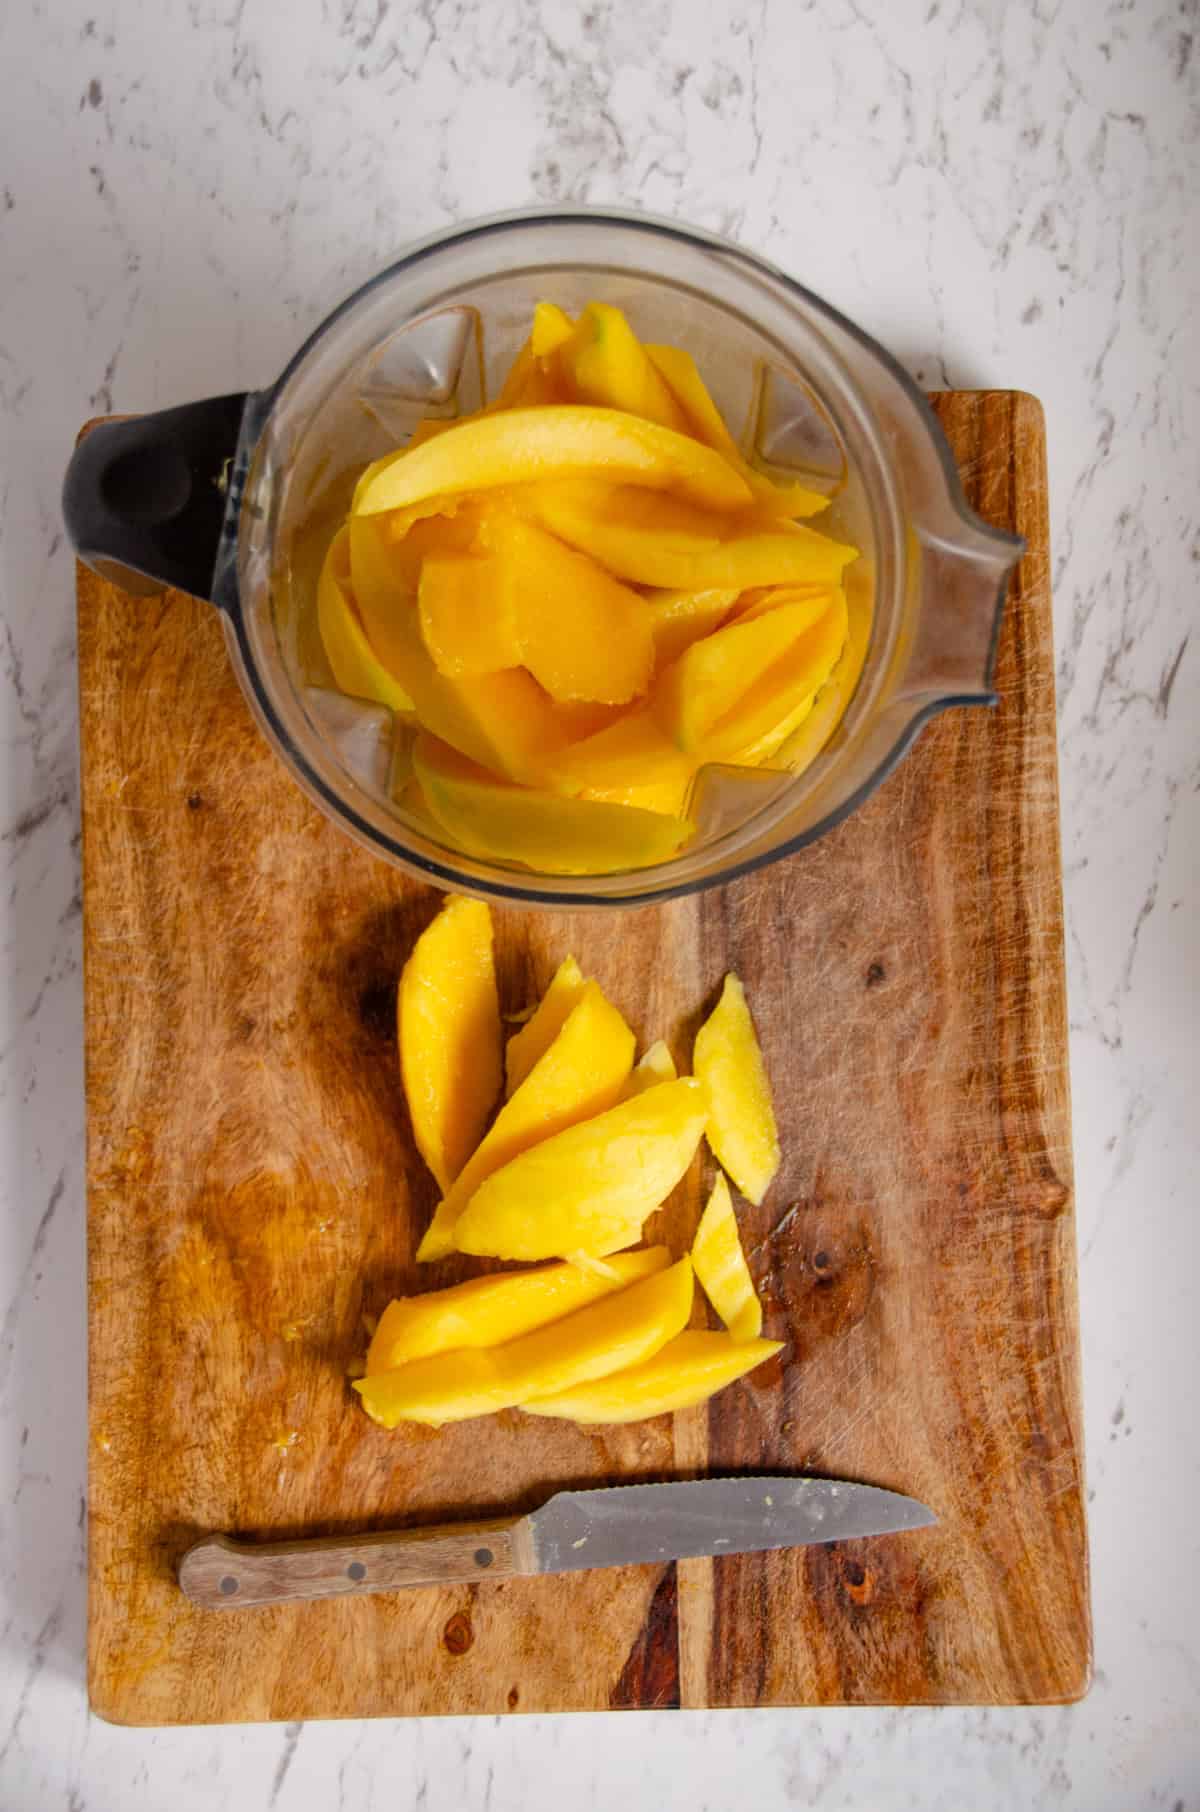
2. Blend the fruit: Place the mango into the blender and blend until it is a smooth purée. Stir in chia seeds if you are using them.
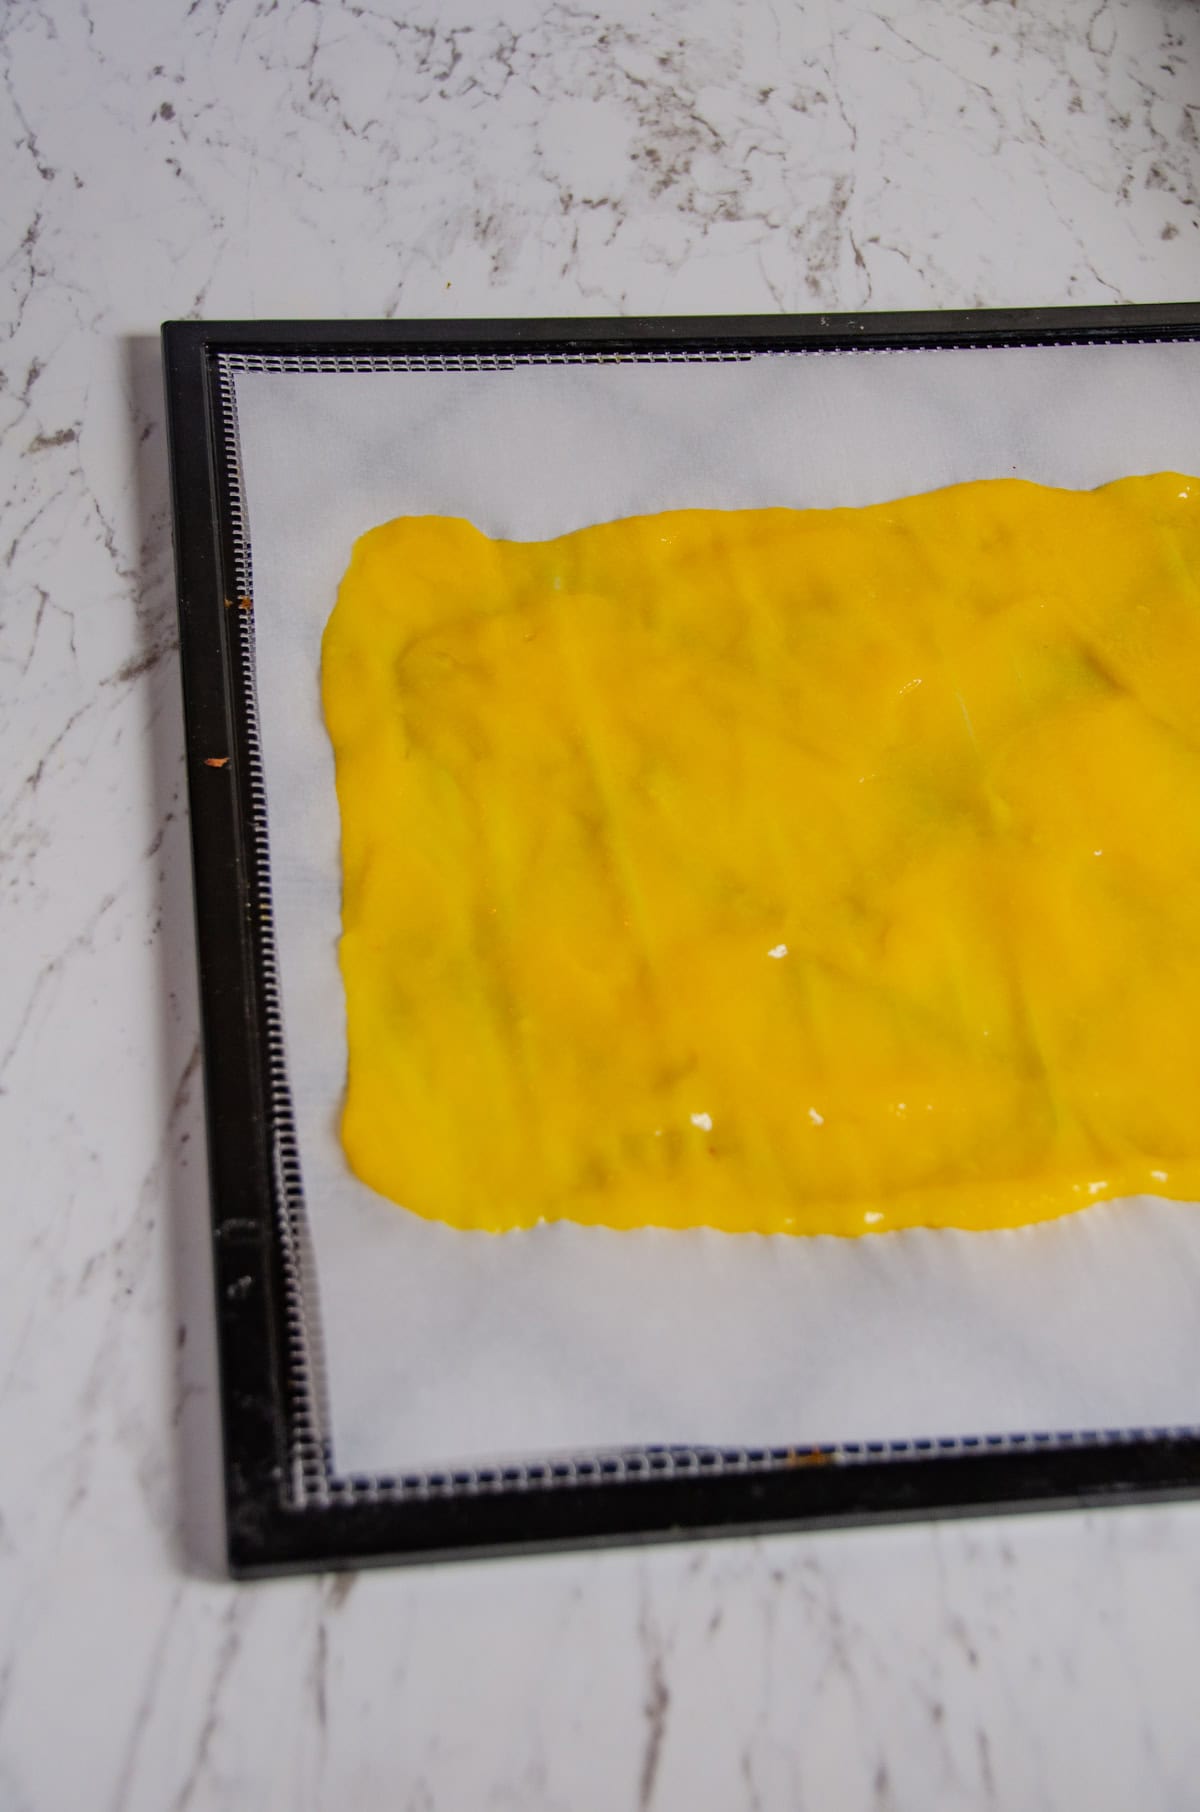
3. Spread and dehydrate: Prepare cookie sheets or dehydrator trays by covering them with parchment paper. Spread the fruit purée as thin as you can without any bare spots (1-2 mm thick).
Shown above is the fruit leather on a dehydrator pan.
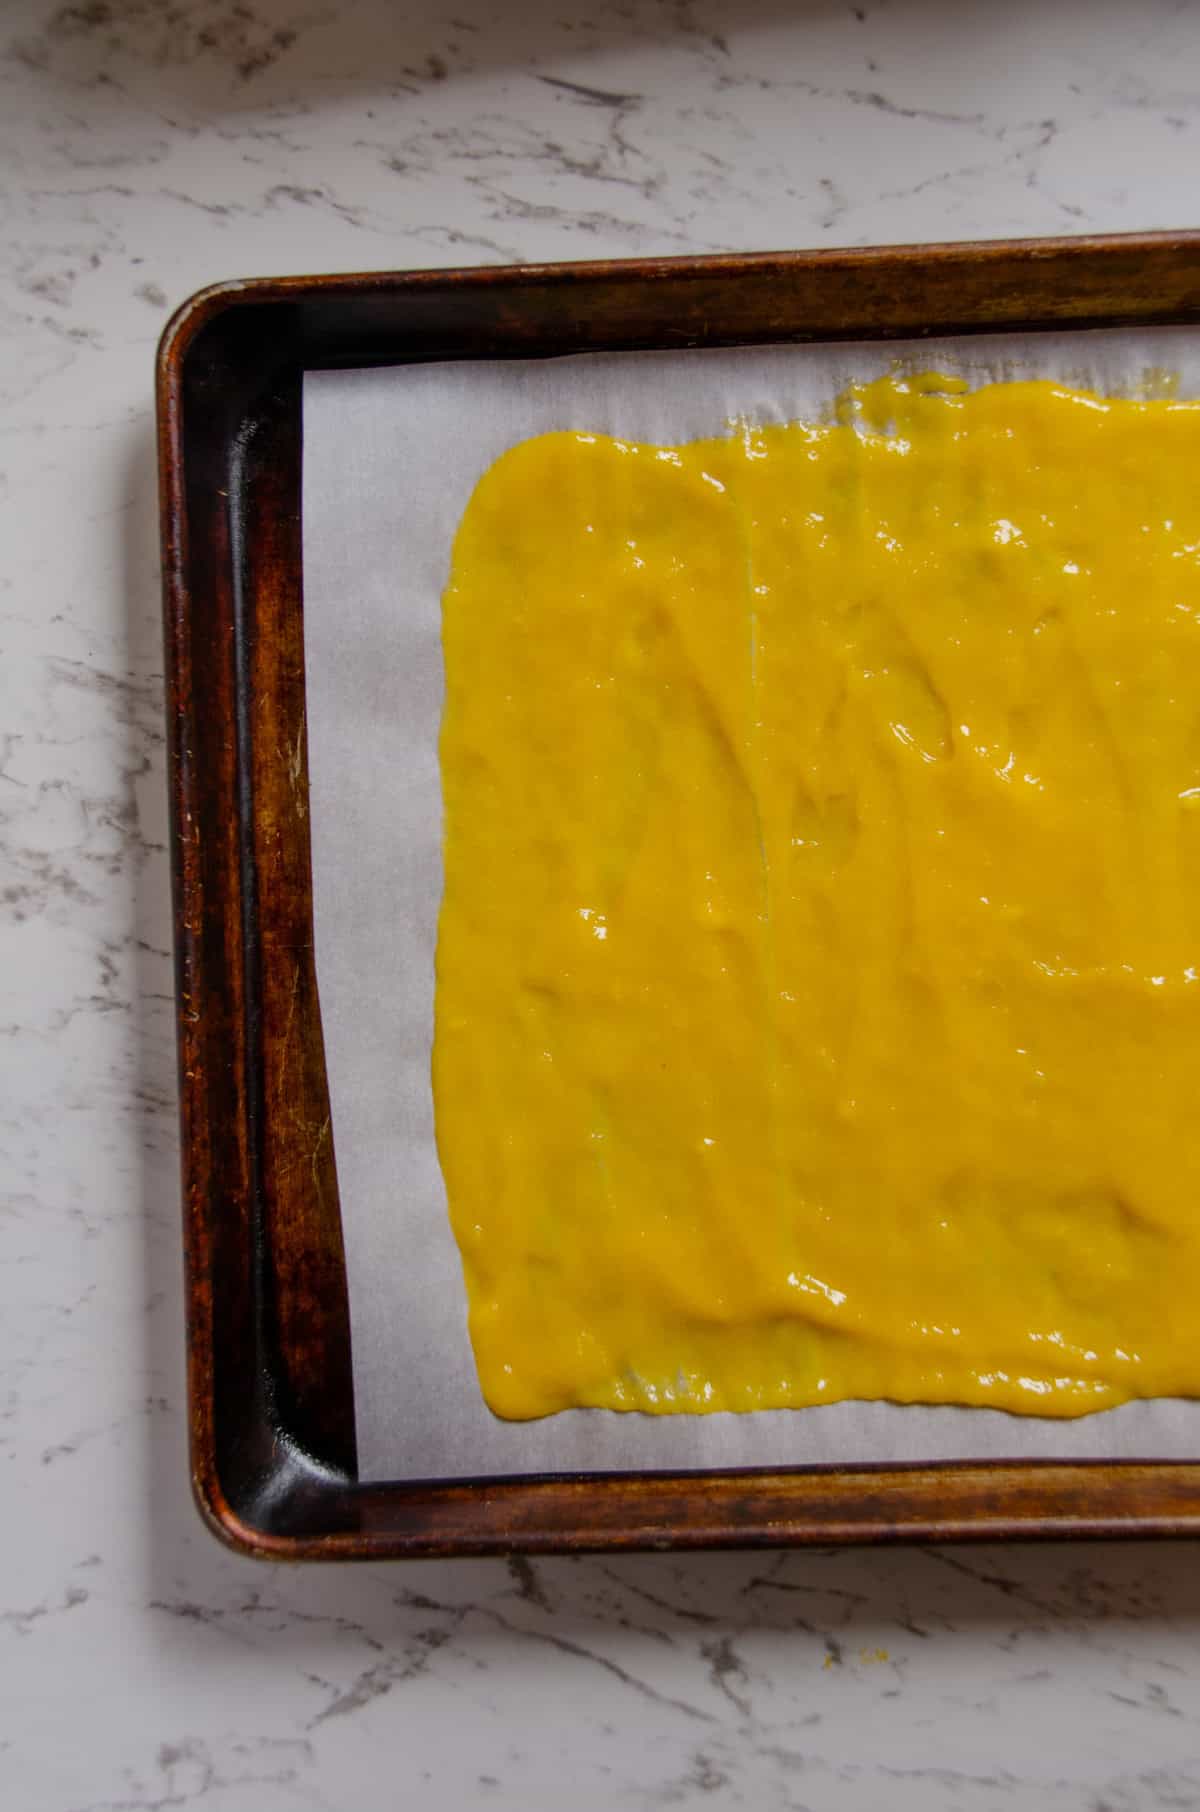
4. Shown above is the mango puree on a cookie sheet that is covered in parchment paper.
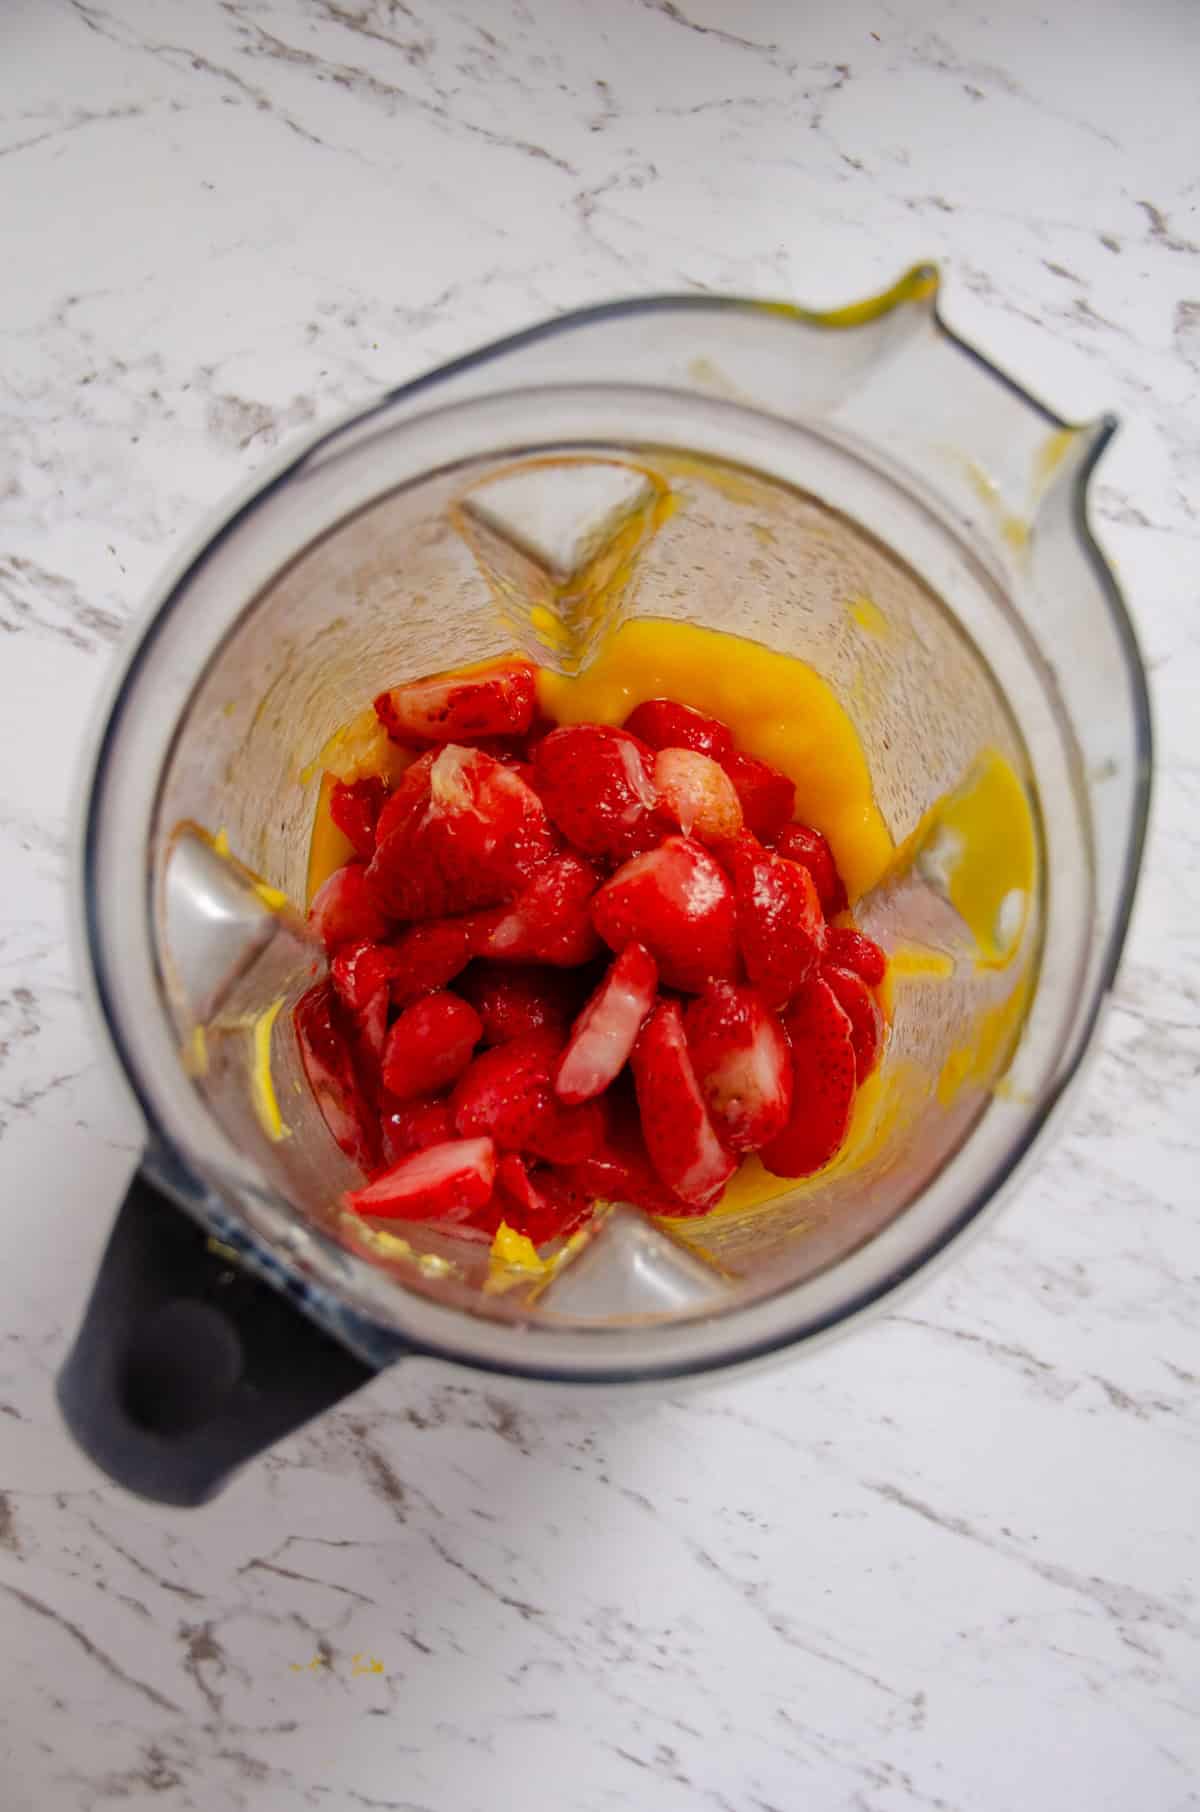
5. With some mango puree left in the blender, add the washed and destemmed strawberries.
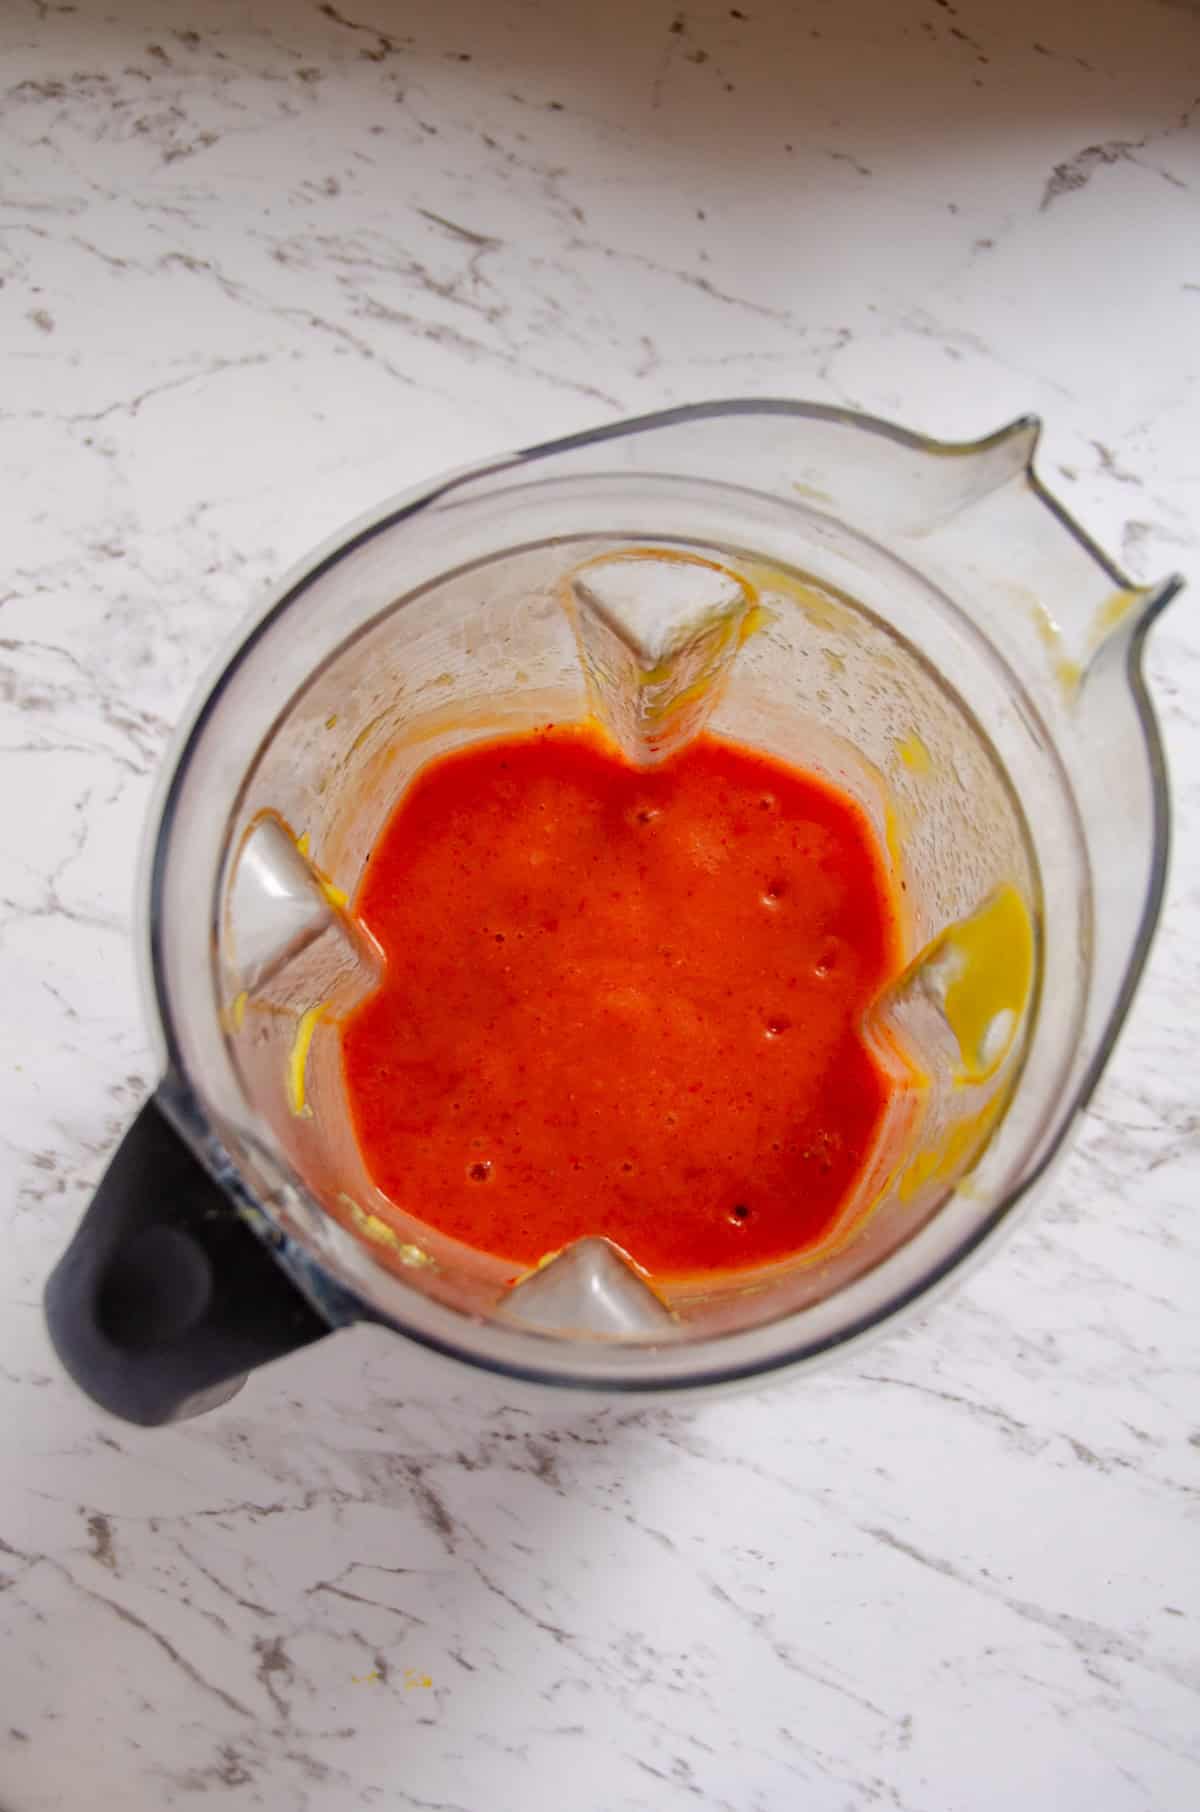
6. Blend until you have a bright pink smooth puree.
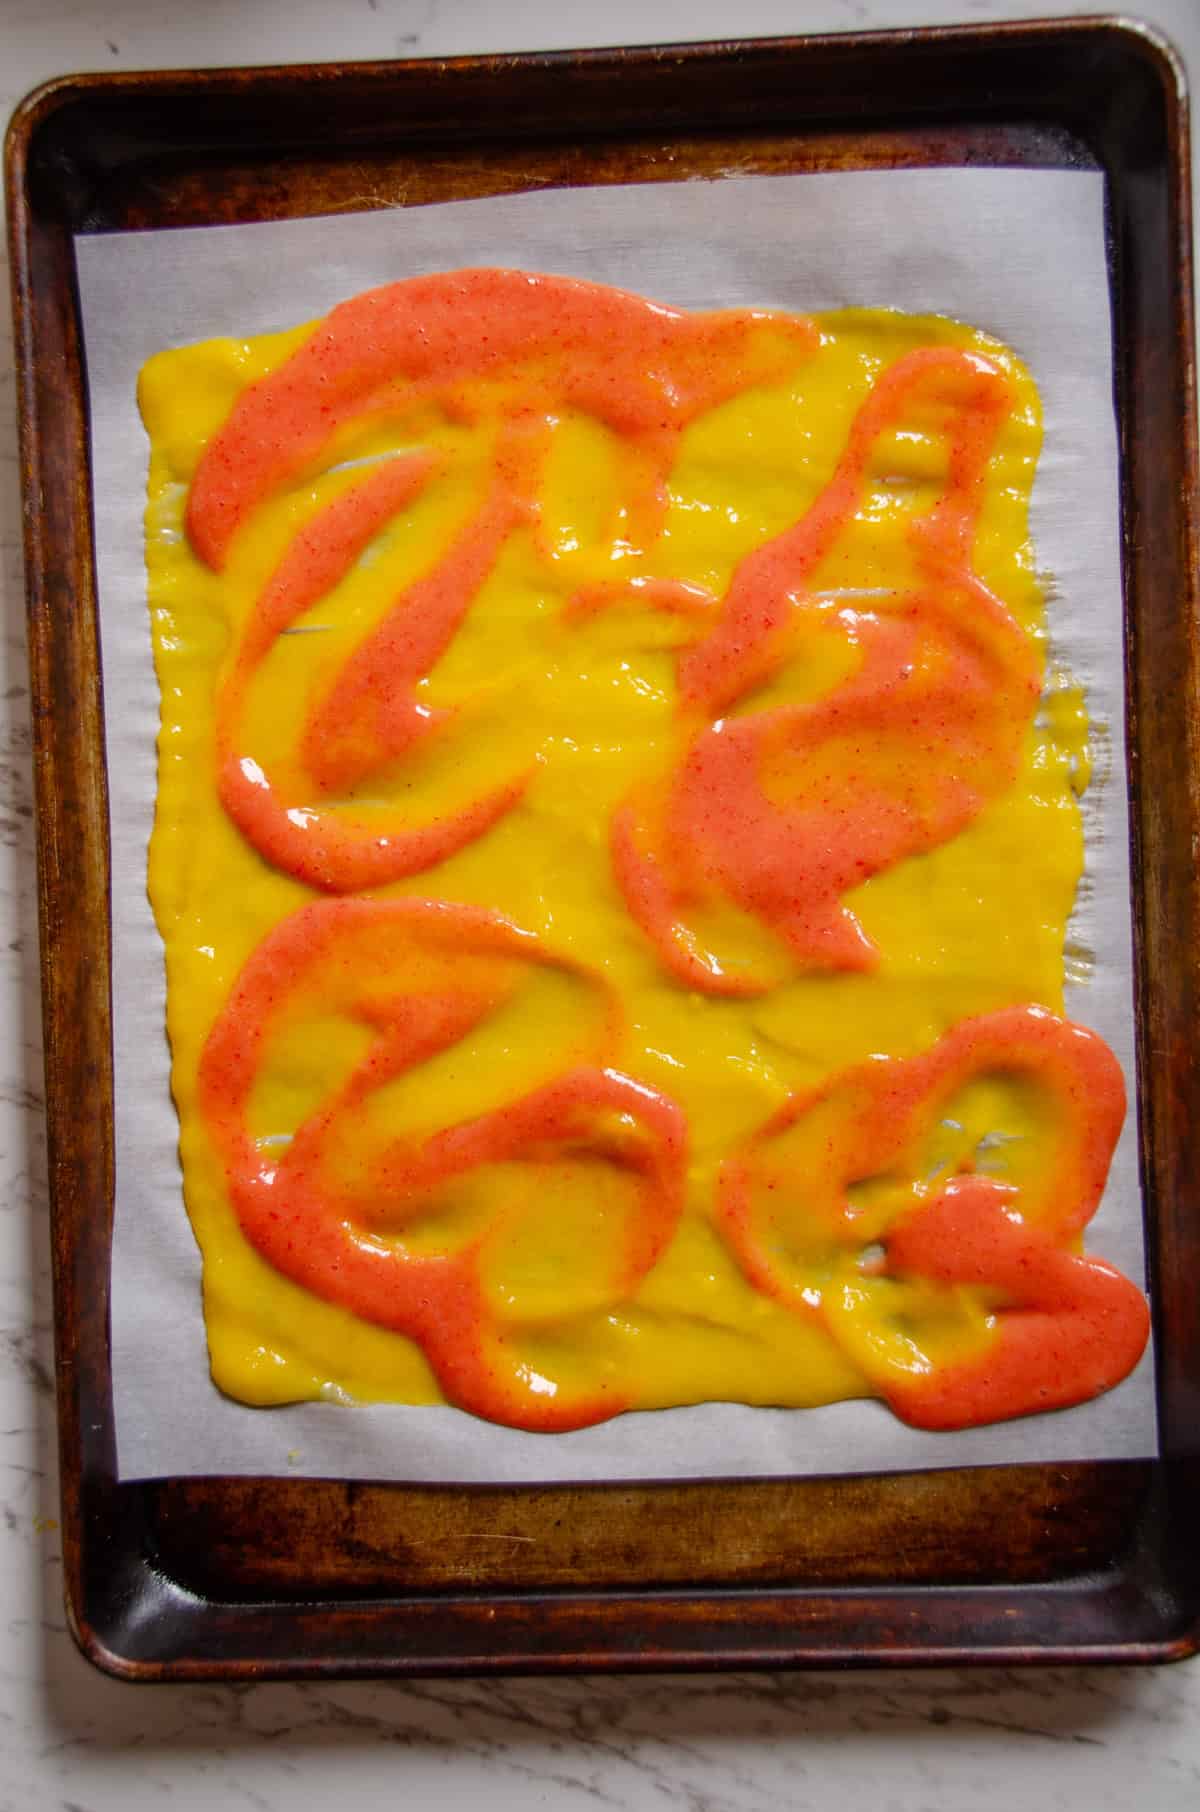
7. You can dollop the pink puree on top or you can make yellow columns and a pink column for a fun look.
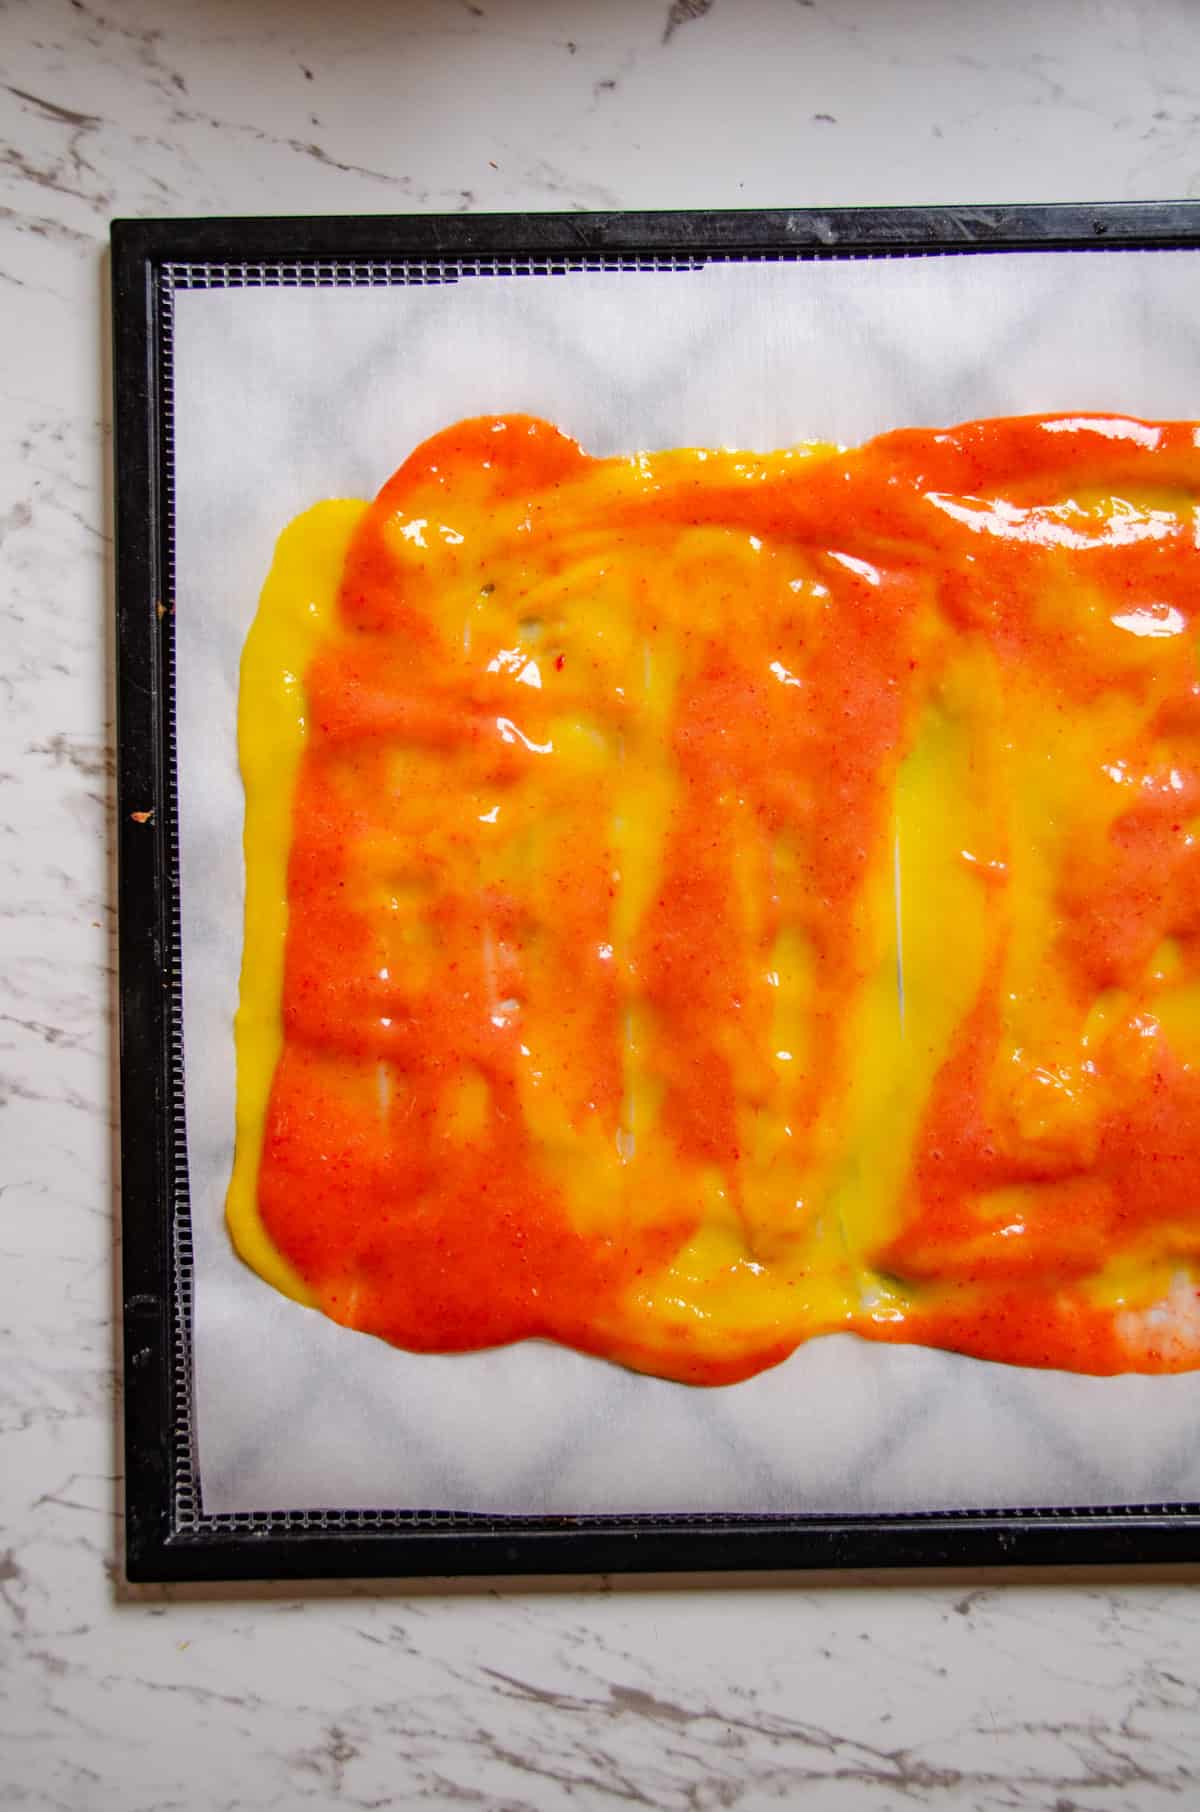
8. Swirl the puree together using a fork. You can see above that this is how I spread it out on my dehydrator tray.
9. Now bake or place in the dehydrator until there are no wet patches (more notes on temp and time below).
If the fruit leather becomes too dry and even crispy in places, use a spray bottle to spray water or use your hands to drip water over it to soften it. Leave it on the counter to absorb any water sprayed on it.
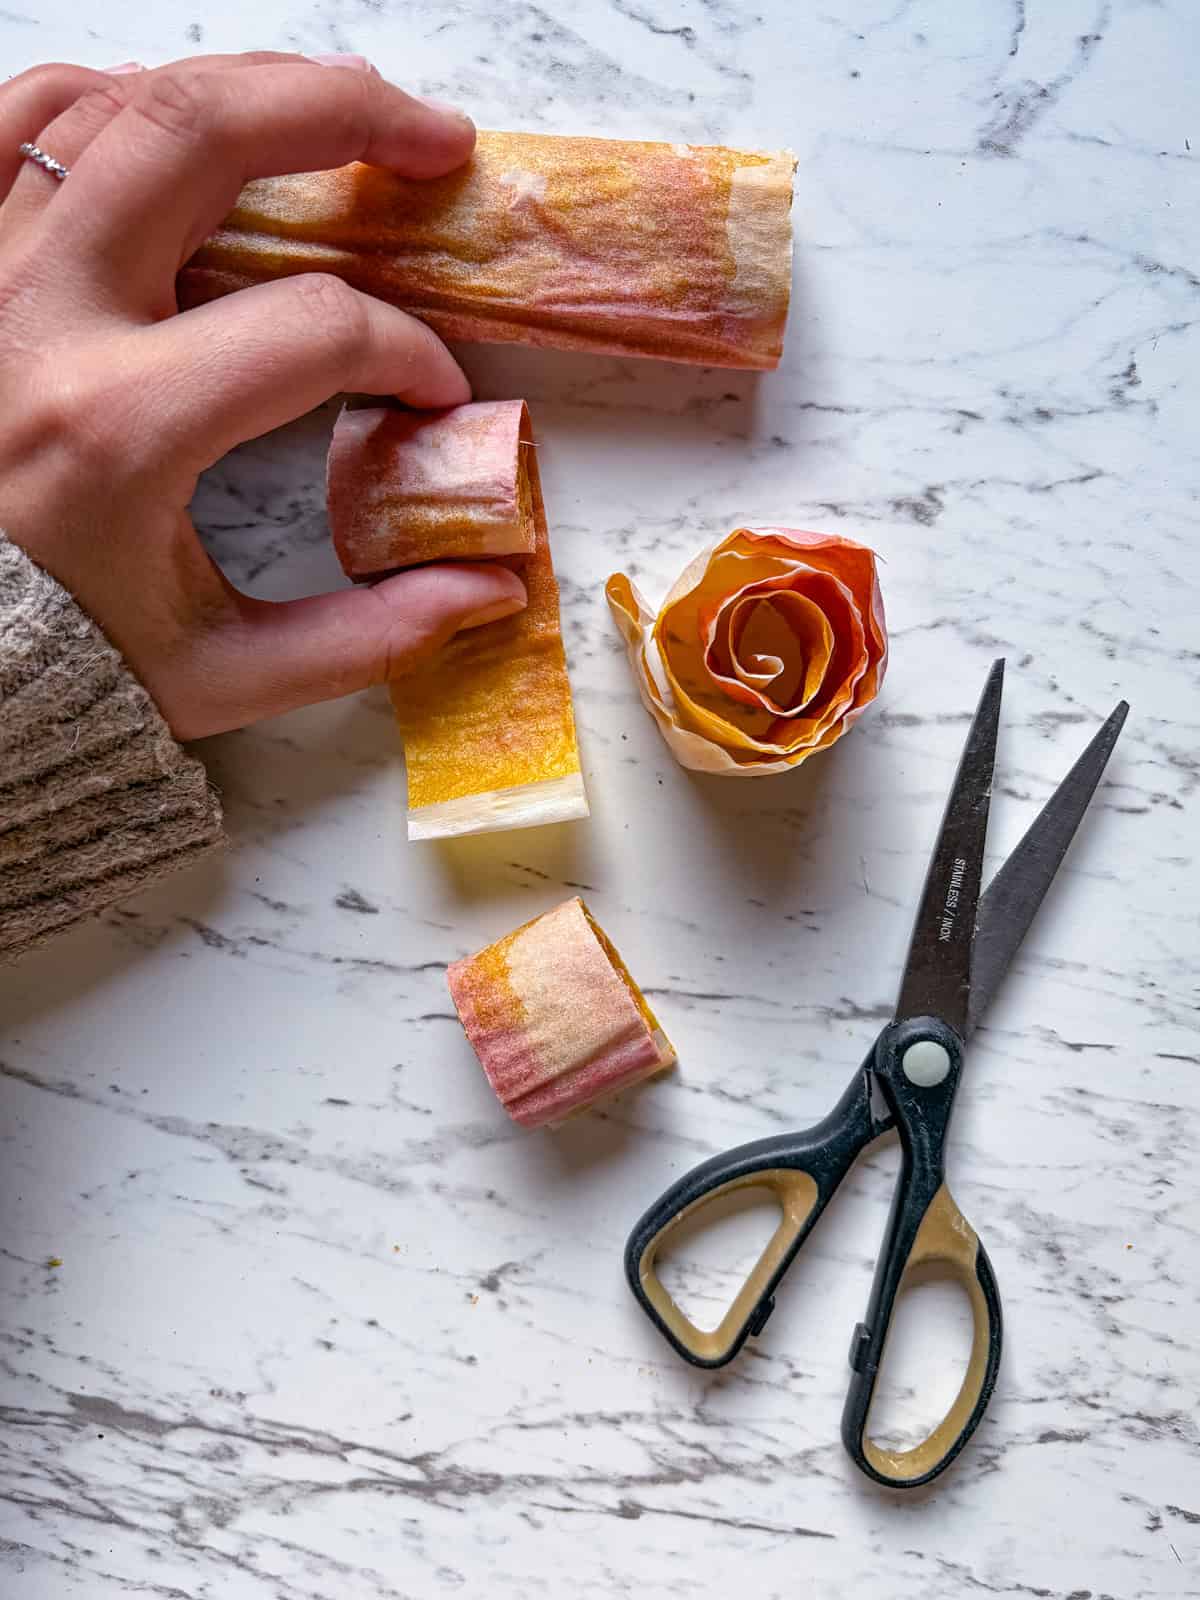
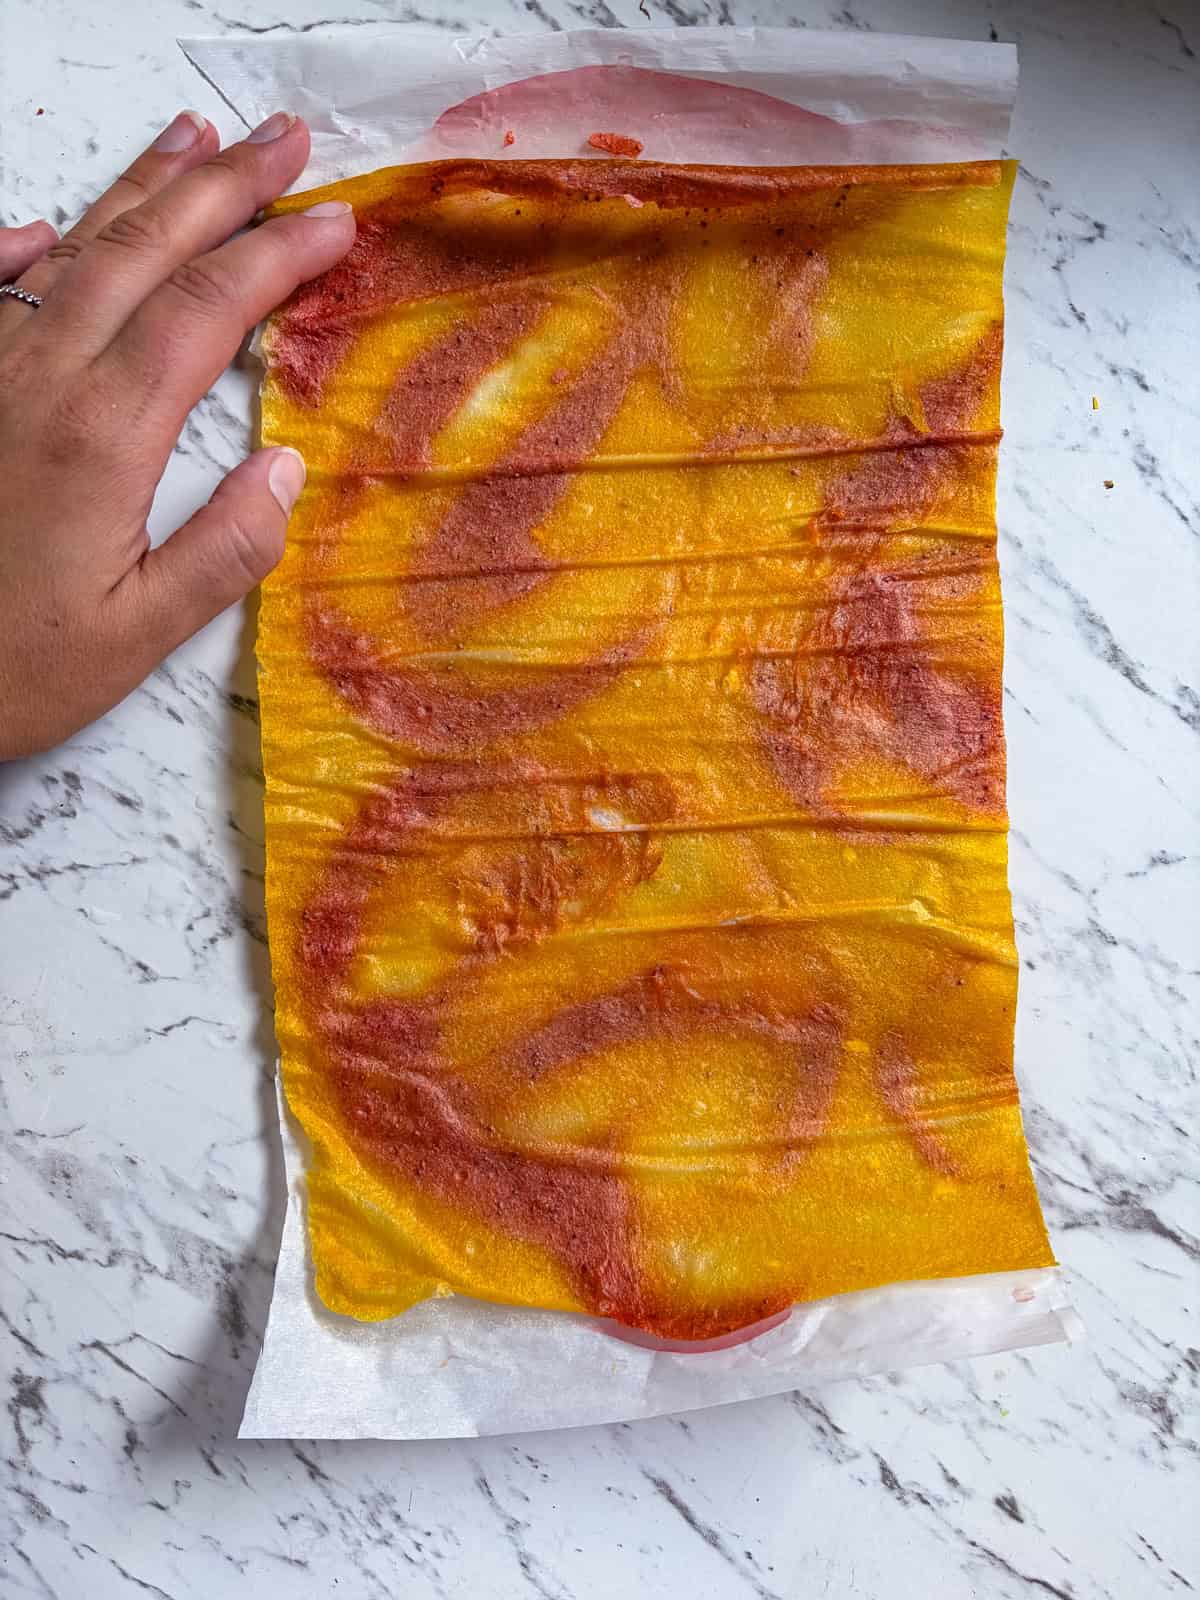
10. Roll and cut: When the fruit leather is done, it will look dry and feel tacky. Keeping the parchment paper on the back, roll the whole rectangular sheet of dried fruit. Use scissors to cut into 1.5-2 inch pieces.
My experience with the oven vs dehydrator
Using a dehydrator: Put the dehydrator on the fruit setting or between 125°F to 145°F. It will take from 3 to 8 hours (maybe longer), depending on how efficient your machine is and how thick the fruit is spread. It will look dry and feel tacky when it is ready.
In the oven: You will need 2-3 cookie sheets for this recipe. Make it a bit thicker on the edges and thinner in the middle to help the fruit leather dry evenly. Place the cookie sheets in the oven as low as it will go (most ovens go to 180°F or 170°F) if you have a convection fan, that will make the leather dry out faster. It has taken me between 6 to 12 hours to dry.
I tested this recipe in the oven, in a circle dehydrator, and in a square excaliber dehydrator. Oven: I found the oven took the longest time (6 hours and sometimes up to 10 hours), and it turned the fruit a darker color because of the higher heat. The square excaliber dehydrator machine had a good fan moving the air, so it took 4-8 hours.
Homemade Fruit Roll-up FAQs
Sometimes I will dry the fruit leather, and it will be much thicker in the middle than the sides. Or we dried the fruit leather too long; it may be more crispy like a fruit cracker! To make your homemade fruit leather softer you can mist it with a spray bottle to make it softer. Or even sprinkle water on it with your hands and let it sit for a while to absorb the water. Add a little water at a time to rehydrate the leather until it becomes softer.
Yes, you can make fruit leather with frozen fruit. Honestly, this is so easy because it's already peeled and chopped for you. You will need to let the frozen fruit thaw slightly by letting it sit on the counter for 30 minutes up to a couple of hours, but then use it according to the recipe. I like to use frozen mango or frozen strawberries to make fruit leather.
I have fed my kids fruit leather for months. The key is to make sure there are no wet spots after dehydrating it because that's what will go bad. And what you need to do is see it in a ziplock bag.
I created an eCookbook for prepping snacks! This was designed to set aside a block of time weekly or monthly to batch prep wholesome snacks.
It's all freezer-friendly recipes, with a clear plan (grocery list too!) to make the most of a two-hour time block in the kitchen!
Other Healthy No-Bake Recipes to Consider

🍓🥭Did you make this strawberry fruit leather? I'd love it if you took 5 seconds to give a star rating and review just below the recipe. That means a lot to me and helps the growth of Beside the Mountain blog.
How to Make Fruit Roll Ups
Ingredients
- 4 mangoes large
- 1 ½ tablespoons lemon juice
- 2 cups strawberries
Optional
- 2 tablespoons chia seeds
Instructions
- Peel the mangoes and cut the fruit away from the pits. Place the mango flesh and lemon juice in a blender and blend until completely smooth. Line 2 large baking sheets or 4 dehydrator trays with parchment paper or silicone mats. Pour the 1-2 cups of mango puree onto the prepared trays and spread it into a thin, even layer, making sure there are no thin patches (save some of the mango puree in the blender).
- Remove the stems from the strawberries. Then with about 1 cup of mango puree left in the blender, add the strawberries and blend until the mixture is very smooth and thin. Pour the pink strawberry mixture onto the trays in lines beside or over the mango puree. Sprinkle the chia seeds on top of the puree fruit if using. Use a spoon or skewer to gently swirl the mixtures together for a swirl effect.
- For the dehydrator method, dry at 115°F for about 5-8 hours. For the oven method, bake at the lowest temperature setting, about 170°F, for approximately 6 hours. The fruit leather is ready when it feels dry and even spongy to the touch. It will peel away easily without sticking.
- Roll the parchment paper and fruit leather into a log and then cut into about 1.5-2 inch chunks. Keep them in an air tight bag or container and they will last for months.
Notes
Nutrition
For other dehydrator recipes, try these zucchini chips or my strawberry rhubarb fruit leather.

Danika Vanderpyl, C.H.N
I create snack recipes with healthy ingredients that are mostly already in your kitchen. I'm certified in Holistic Nutrition and I care about giving my kids real food. Let me share my nutrient-dense easy snacks with you.


Andrew says
These are incredible. we take them hiking and backpacking all the time as they are light, nutritious, and the kids love them. you can also burn the paper in the campfire in the evening.
Danika Vanderpyl says
Glad you like these so much!